
Browser Caching: Instantly Increases Web Page Speed
Introduction to Leverage Browser Caching
Are you Looking for ways to increase your website loading speed massively??
Do you ever checked your website in online page speed testing tools such as GTMetrix or Google Pagespeed Insights & noticed a warning for Leverage Browser Caching?
Then, You have landed here for a right reason. In this article, I’m going to give details about caching. It will help you understand what it is all about and how you can enable it on your own website.
What is Leverage Browser Caching?
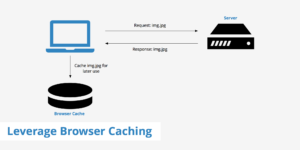
Typically, when a you visit a web page of web site, the web browser has to load several different resources such as the JavaScript files, style sheets (CSS), images and logo file. Further, your browser downloads web files( CSS file, JS files, HTML files, images, text.. ) from the server to properly render the page. The time it takes to load these files may vary. This may also depend on the speed of the web site.
So If you access any other pages on this website or the next time you visit the same website, you may notice an increase in speed and faster load time as some of the web resources such as logo, CSS files are retrieved from browser rather than web server. Here, your browser loads the web cache from the local disk and only requests updated content from the webserver. This is called as browser Caching.
Without the Browser Caching set-in, the browser will request the same web files over and over each time you visit the same web page in the future. That results in longer page load time, more bandwidth usage & server load too.
Therefore, Browser Cache or Web Cache is temporarily storing of web files of a website by the browser on the hard disk for future use. And, Caching also enables your browser to store & recall all the saved files that were previously loaded on the initial visit of the website.
What is leverage browser caching?
By using leverage browser cache, you as a webmaster instructing the browser to store a copy of web files. so that they don’t have to be loaded from the server each time visitor requests a page. If a visitor re-visits your site or accesses any other pages on this site, they will notice an increase in speed and faster load time. It is because the resources are retrieved from the visitor’s browser rather than the web server.
Caching is a strategy that can help you increase the speed of your website. Thus allowing you to retain your potential visitors. And reduce your overall website load time and bounce rate.
When you use it, your webpage files will get stored in the browser cache. Your pages will load much faster for repeat visitors as it stores some resources of pages that share those same resources.
In simpler terms, the browser “remember” the resources that it has already loaded. This is the reason that the first view of a web page takes longer than repeated visits. To use it, a webmaster instructs browsers how their resources should be dealt with.
Advantage of Leverage Browser Caching
Setting up Browser Caching may improve the following.
- Webpage loading speed time
- Visitors experience.
- Improve your Google PageSpeed score, thus helps in improving the web performance testing score.
- It reduces server load time and much less bandwidth.
How to leverage browser caching?
To leverage browser cache, you have to do the following two steps. They are
- Change the HTTP request headers of your resources to use web caching.
- And, Optimize your web caching strategy.
Caching methods for browsers
For all cacheable resources, always specify either one of Expires or Cache-Control max-age, and one of Last-Modified or ETag. It is redundant to specify both Expires and Cache-Control: max-age, or to specify both Last-Modified and ETag.
Two Different Methods of Caching
1. “Expires” using .htaccess.
It takes care of caching for most people who are just getting started. It is also possible that the expires method did not work for your web server, in that case you may try to use Cache-Control.
2 Cache-Control using .htaccess.
It is an alternative method of caching technique which gives us more options. You may use it once you are more comfortable with caching mechanism.
Pro Tip :
Using both the Expires Headers & Cache-Control together is not at all recommended.
Pre-Requisites While Setting Browser Caching
Before enabling it, you should have an idea on below two points. They are :
- What resources(files) to Cache?
- How often you modify the files?
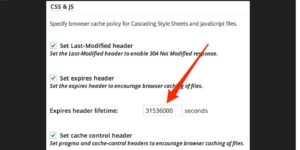
By Enable Browser Caching, webmaster defines the time period in which a browser should store the temporary data files before updating.
Usually, your Stylesheets, images and Script files [ CSS, JS, Images ] don’t tend to change a lot. So setting Cache period to months or even a year is absolutely fine.
Here, The period may be anything ranging from days to months or even years. And it will depend on the frequency you change your web resources. And, only you as a webmaster can determine the best for your site resources.
How to setup Browser Caching in WordPress
We may enable it primarily in 2 ways. They are given below.
- Directly editing the .htaccess file of webserver
- Using WordPress Plugins
By adding the Expires Headers to your web server’s .htaccess file you can achieve amazing results to your web site loading speed.
The webmaster needs to edit .htaccess file & add Expire Headers for it to work properly. The .htaccess file can be edited directly from the Cpanel [aka web hosting access console] or you may use plugins like Yoast.
The .htaccess file controls many important things for your web site. If you are not familiar with the .htaccess file, take the backup of .htaccess file & update the file.
And if you are not comfortable playing with your server’s .htaccess file, then you may try WordPress plugins below.
Accessing .htaccess file of your web server
We can do this in two ways.
1. Cpanel method
2. FTP client (such as Filezilla, WinSCP)
Accessing Via CPanel
First login your Cpanel
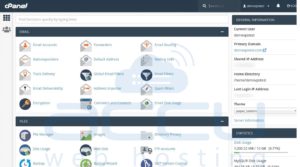
Go to the file manager then
Now open the file manager directory. Then, locate settings at top corner of the right side. Just click here and check “Show Hidden Files (dotfiles)” & click on save.
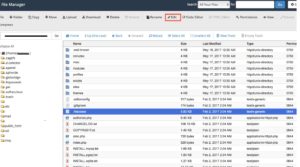
Then, It will show all dots & hidden files. Please download only .htaccess file.
Accessing Via FileZilla
Please provide details of the credentials of the server in the FileZilla window & then login into it. Then, go to public_html >> .htaccess file, drag and download it for editing.
Once the download is complete, open .htaccess file in any code editor. Then, add code of Leverage Browsing Caching to the file of .htaccess. Also, Please do not delete any code inside .htaccess file.
Once the update is done, please re-upload .htaccess file to the server either by Cpanel or Filezilla.
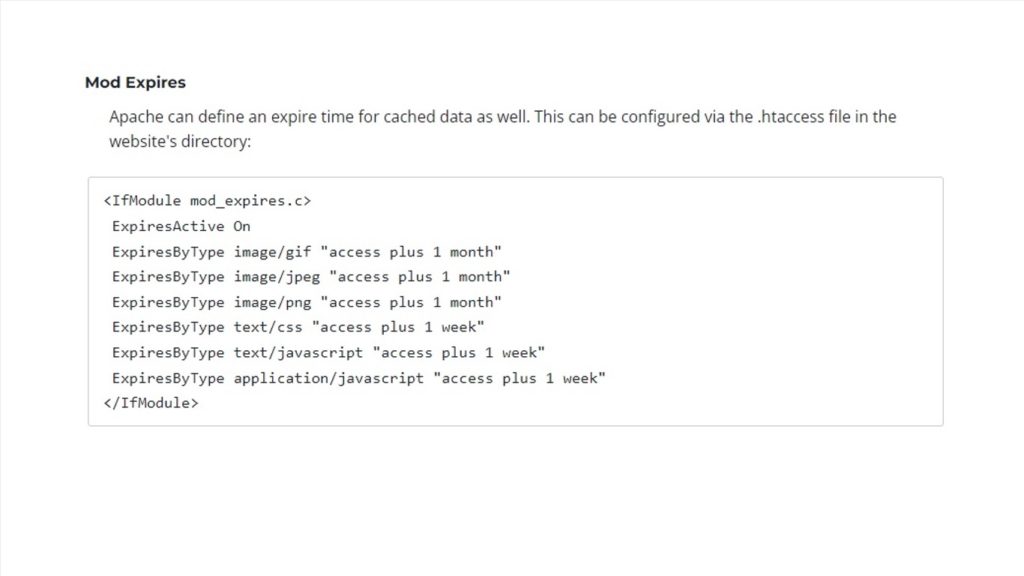
Adding Expires Caching Headers by updating .htaccess
You may find .htaccess File in Website Root Directory. Please add a piece of code to .htaccess file.
The below code instruct browsers what file types to cache and how long to “cache” these file types. It must be added to the end of the .htaccess file of the webserver.
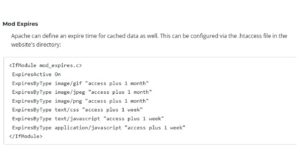
Save .htaccess file & refresh your webpage.
You may download the file from Here
The code above does a few things:
- The above piece of code instructs the web browser which file types are going to be cached. Image file types such as gif, jpg, & jpeg are specified here. Further, you may notice other file types such as PDFs, JavaScript and CSS as well.
- It instructs the browser how long the documents files should be cached for (example, days, months or years if required)
The above code is optimized for almost all kinds of blogs & websites. But if you change the file types on your website more frequently, you can replace the ” 1 month ” with your own value.
Further, Please note while enabling Browser Caching, if you set them with a very long period, your readers may not get an updated version of your website if it updates. Usually, the above method of Expires Headers is enough for most websites.
But, Sometimes the Expires Headers method didn’t work as expected in some servers, then Cache-Control method is a good option to consider.
Adding Cache-Control Headers By updating .htaccess
Cache-Control gives more control over browser caching.
And, save the .htaccess file once update is done.
You may download the file from Here
The above code is trying to set a cache control header depending on the file type. It successfully enables it for your website.
You may change cache expiration to one of either week or month or year. By default you need to set at least 7 days or 1 week. Otherwise, you will face the leverage browser cache issue for your website.
How cache-control works
Let’s try to understand the above code line by line.
# 1 Month for most static assets
The above line represents a comment. It does not do anything except comment on what you are doing. Lines that start with the character # in .htaccess will be ignored. the comment is recommended as you may have several different sets of files as your caching solution grows over a period of time.
<filesMatch “.(css|jpg|jpeg|png|gif|js|ico)$”>
The above line represents that “file types are one of these types, then some action needs to taken with it…”
Please notice that the file may contain different types of file types (CSS, js, jpeg, png, etc.). The caching instructions provided in the file will only apply to those mentioned file types of file. As an example, if you don’t want jpg files to be cached for the amount of time, you may delete “jpg” from the above line of code. Further, if you want to add HTML to the file, you may just add “html” to the above line of code.
Header set Cache-Control “max-age=2592000, public”
The above line is where the actual headers are inserted and the values are provided as per your wish.
-
- “Header set Cache-Control” states that it sets a header.
- “max-age=2592000” states how long it must be cached. It is specified using seconds. It is caching for exactly one month which is “2592000” seconds.
- “public” is stating that this is public.
</filesMatch>
The above line closes the statement and ends the block of code of .htaccess file.
Leverage Browser Cache with WordPress Plugins
If you are worried about modifying the file or confused with the whole process or you don’t have access to .htaccess then the same may be achieved by using Browser Caching WordPress Plugins.
WP Fastest Cache
WP Fastest Cache is available for free in WordPress repository. Also rated with 5 stars with over 5lakh installs.
WP Fastest Cache plugin handles all types of resources very well. Besides Browser Caching, It has some awesome features to improve page speed too. Features include Minify CSS & HTML, Gzip Compression, Combine CSS & JS to reduce requests etc. In Fact, WP Fastest Cache has a lot more functions than just Leverage Browser Cache WordPress. Do Install the plugin, & explore its full potential to learn more about it.
- First Install the WP Fastest Cache Plugin.
- Go to settings of WP Fastest Cache Plugin.
- Now, Turn on Browser Caching. See Attached Snapshot.
- Click Submit.
- It will successfully enable it for your website.
WP Fastest Cache works by producing static HTML files for your website. It renders cached pages over and over again to site visitors. This allows the users of your website to access the information at lightning speed. It also reduces the number of requests needed to serve up the webpage.
When you use plugins like this, there is no need to change the .htaccess file. Also, Plugin will do everything for you once you enable and set configuration settings as per your wish.
W3 Total Cache
W3 Total Cache plugin is one of the popular plugins available for free in the WordPress repository. Apart from Browser Caching, this plugin also offers lots more features. Such as the Minification of CSS & JavaScript, AMP support, SSL support, Various security features, etc.
- Install the W3 Total Cache Plugin.
- Go to General Settings of plugin.
- Turn on Browser Caching & click Save button.
- Go to the Browser Cache Settings tab.
- Turn on Expires Headers, Set Cache-Control Headers.
- Save all settings
- With this, You have completed enabling Browser Caching for your website
Re-testing your website for Leverage Browser Cache
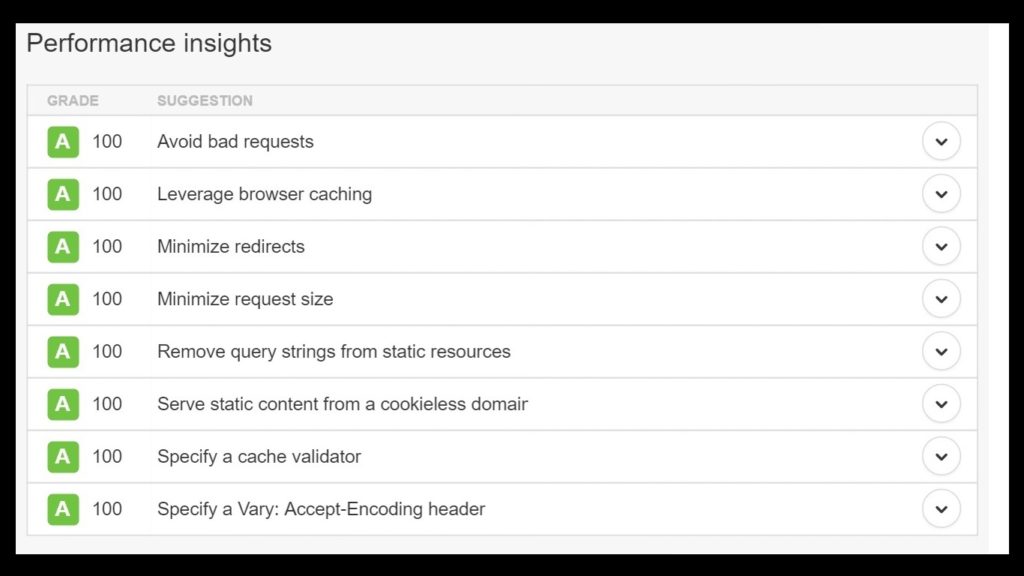
Now, it is time to recheck website with the Pingdom tool. See below, how it improves the score for Leverage Browser Cache for your website. Also, you may see page speed of your website too.
Speed Even Further
After enabling it, you will start seeing great improvements in the performance of your website. If you wish to see it in the Chrome browser, Go to Chrome Developer tools. And click (Ctrl+ Shift + I) and hit F5 to see how it has been performing.
Further, if you wish to improve speed a lot more than that you may try the following too. They are Minifying the CSS and JavaScript files & Enabling Gzip Compression for your website.
What are the Best Practices for Using Browser Caching With HTML5, CSS3 And JavaScript?
The browser cache stores data that helps speed up page loads by storing previously downloaded files in memory. This article will show how to leverage browser caching for better performance on mobile devices.
We’ll also cover some best practices when using HTML5, CSS3 and JavaScript to optimize your web pages.
Cache Images with HTTP/2.
In order to make sure that images load quickly, we need to use the right image formats. JPEG is an old format that was designed to store still images. PNG is a newer format that supports transparency. GIF is another older format that is used to display animations.
Use Server Side Includes (SSI) to Include Static Assets.
If you’re using static assets such as images, CSS files, and JavaScript files, you should consider using server side includes (SSIs). SSIs allow you to embed these files into your website’s source code without having to download them every time a visitor requests a page. This makes it easier for visitors to view your site because they won’t have to wait for large files to download before viewing your content.
Use Client Side Includes (CSI) to Include Dynamic Assets.
In addition to SSIs, you can use client side includes (CSI) to include dynamic assets such as JavaScript and CSS files. CSI allows you to embed these files directly into your webpages’ source code so that they will only be downloaded once by each visitor.
Use Web Fonts to Reduce Bandwidth Usage.
If you’re looking to reduce bandwidth usage, then you should consider using web fonts instead of downloading individual font files. This technique reduces the number of HTTP requests required to load a webpage because web browsers cache the fonts used in a website.
Use Responsive Design to Create Mobile Friendly Pages.
Web fonts are an easy way to make your site more mobile friendly. They allow you to use smaller file sizes than regular fonts, so they take up less space on your server. In addition, they work well with responsive design techniques, allowing you to scale down the size of text as the browser window shrinks.
What Is Browser Caching?
The term “browser cache” refers to the temporary storage that web browsers keep for websites they’ve visited before. This helps speed up loading times by storing previously downloaded files in memory so they’re ready when you return to the page. Read on to discover how it works and how you can use it to boost your site performance.
If you’ve ever noticed that some pages load faster than others, then you’ve probably experienced browser caching. It’s an easy way to make sure that your website loads quickly for visitors.
Why Should You Care About Browser Caching?
Browser caching is one of those things that sounds simple enough, but there’s actually quite a bit going on behind the scenes. Let’s take a closer look at what happens when you visit a web page. First, your computer sends a request to the server hosting the page. This is called a “request.” Then, the server responds with the requested data. Finally, your computer receives the response and displays it to you.
How Can I Cache My Site?
If you’re using a website builder such as Wix, Squarespace, Weebly, etc., then you’ll need to enable browser caching. You do this by adding a few lines of code to your theme files. Once you’ve done that, you’ll see an improvement in load times because the browser will cache the pages you view.
How Do I Know If My Site Has Been Cached?
There’s no easy way to tell whether your site has been cached or not. However, there are some things you can check to make sure your site isn’t being cached. First, go to Google Search Console and click on “Crawl” under “Search Traffic.” Then, scroll down to “Cache Status” and click on “View Cache.” Finally, scroll down to “Last Modified Date” and click on “Refresh.” If the date hasn’t changed, then your site hasn’t been cached yet.
How Do I Manually Cache A Page?
Once you’ve verified that your site isn’t being automatically cached, you’ll need to manually cache your pages. This will ensure that when people visit your site, they’re seeing the latest version of your website. You can do this by adding the following code to your .htaccess file (which is located in the root directory of your site).
What are 5 Ways To Improve Your WordPress Website Speed With Browser Caching?
Browser caching is an important part of improving website performance. It helps reduce the number of requests that need to be made by the browser when loading a web page. This reduces the amount of data that needs to be transferred over the internet, which improves the overall user experience.
Enable Browser Caching.
In order to enable browser caching, you will first need to make sure that your server has the necessary configuration settings enabled. You can do this by visiting your hosting control panel and looking under “Performance” or “Settings”. Once you find the setting, click on it and then select “Enable Browser Caching”.
Set Cache Expiration Time.
After enabling browser caching, you will need to set an expiration date for each cache file. This means that when a user visits your site, the browser will check with the server to see if there is a cached version available. If so, it will use that instead of downloading the file again.
Add Expires Headers.
You can add expires headers to any static files (images, CSS, JavaScript) by adding them to the.htaccess file.
Remove Unnecessary CSS & JS Files.
If you use a lot of images on your site, you should consider removing unnecessary stylesheets and javascript files. This will help reduce the size of your web pages and make your site load faster.
Minify JavaScript & CSS.
You can also minify your JavaScript and CSS by combining them into one file. This will save bandwidth and speed up your site as well.
Why You Should Be Using Browser Caching With Your Website?
The web has changed a lot since the early days of the internet. Back then, websites were static documents that loaded quickly. Nowadays, we’re dealing with dynamic content that loads in real time. This means that every page load takes longer because the browser must download all the resources needed for the page. To speed things up, you can use browser caching to store those resources so they won’t need to be downloaded again.
Leveraging browser caching is one of the most effective ways to improve website performance. Learn why you should be using it on your site!
The Benefits of Browser Caching.
There are several benefits to using browser caching. First, it helps reduce bandwidth usage by storing files locally instead of downloading them each time a user visits a page. Second, it speeds up loading times by reducing the number of requests made to the server. Third, it reduces the strain on the server by not having to serve the same file multiple times. Finally, it improves search engine rankings by making sure that Googlebot sees the same version of your pages as users do.
How to Set Up Browser Caching.
To set up browser caching on your website, follow these steps: 1) Create a new folder called “cache” inside your web root directory (the location where your website files live). 2) Copy the contents of the cache folder into your web root directory. 3) Open your.htaccess file and add the following lines at the end of the file: <FilesMatch “\.(ico|jpe?g|png|gif|swf)$”> Header unset Cache-Control 4) Save the changes to your.htaccess file. 5) Restart your web server. 6) Refresh your browser and see how much faster your site loads!
How to Test Your Site’s Performance.
If you’re not sure whether your site is performing well enough, there are several tools available to help you test your site’s speed. One of the easiest ways to do so is by using Google PageSpeed Insights. This free service will analyze your site and provide suggestions on how to make it load faster.
Cache Everything!
There are two main reasons why you should use browser caching with your website. First, it helps keep your site fast. Second, it makes your site more accessible. By storing static files (like images) locally, browsers won’t need to request them from the server each time a user visits your site.
Set up your cache settings.
To set up your cache settings, go to your web hosting account and find the “File Manager” section. Click on the “Caches” tab. Then click on the “Edit Settings” button. From there, you’ll see a list of options. Choose what works best for you.
Why Leveraging Browser Caching Is Important for Your Website Performance?
The web has changed dramatically over the past decade. As websites become increasingly complex, users expect faster load times and better performance. In order to meet these expectations, developers must take into account how browsers handle resources on the page.
Leveraging browser caching is an important factor in website performance. Learn why it’s so critical and what you should be doing about it.
The Importance of Browser Caching
Browsers cache data to speed up loading times. This means that when a user visits a site again, the browser will use its cached copy rather than re-downloading the resource. However, there are some things that browsers won’t cache. These include images, scripts, and stylesheets. If you’re using any of these resources, you need to make sure that the browser caches them. Otherwise, the user will have to wait longer for the page to load.
What You Should Be Doing About It
There are two ways to leverage browser caching. First, you can tell the browser not to cache certain files by adding a special HTTP header to each file. Second, you can add a meta tag to the HTML document that tells the browser to cache the file. Both methods work well, but the first one is more effective because it allows you to control exactly which files aren’t cached.
Best Practices for Implementing Browser Caching
If you use the second method, make sure you set up the meta tag correctly. You need to specify the type of data being cached (e.g., text/html), the expiration date, and the URL where the file will be stored.
Cache Types
There are two main types of cache: static and dynamic. Static caches store files locally on the server, while dynamic caches store files remotely. Dynamic caches are more efficient than static caches because they reduce network latency. However, they require additional configuration.
Cache Settings
To configure your web server to use a static cache, add the following lines to your.htaccess file:
# Set the Expires header to 0 seconds (no expiration)
ExpiresActive On
ExpiresDefault A0
What are the 10 Ways To Cache Your Website Content for Faster Loading Times?
Caching is an important aspect of website development. Learn about caching and how it works on your site!
The term “caching” refers to storing information in a temporary location so that it can be retrieved quickly when needed. This helps reduce server load and improve performance for visitors.
Create a static HTML file.
A static HTML file is one that contains only text and no images or other files. It’s easy to make a static HTML file by using a simple text editor such as Notepad. You can then upload the file to any web hosting service.
Add a cache control header.
If you’re not familiar with caching, think of it as storing copies of your website’s pages so that when users visit them again later, they’ll load faster. This is especially helpful for mobile devices because they often have slower internet connections than desktop computers.
Include a no-cache meta tag.
A no-cache meta tag tells browsers to cache the webpages you’ve linked to. It also helps search engines crawl your site more efficiently by telling them what pages aren’t changing. You can add a no-cache meta tags to every page on your site using HTML code.
Set up a CDN (content delivery network).
If you’re looking to speed up your website’s loading times, then you should consider setting up a content delivery network (CDN) to serve static files such as images, JavaScript, CSS, and other media files. This will help reduce the load on your server and improve performance.
Use a preload service.
A CDN is a type of content delivery network that allows web servers to cache static files so that users can download them faster. It also helps with security by preventing hackers from accessing sensitive data. Preloading is when you upload your website’s static files to a CDN before you launch your site. You can use a free service like Cloudflare to set up a CDN.
What are the Top 5 Tips for Creating an Effective Cache Control Strategy?
In order to create an effective cache control strategy, you must first understand what caching is and why it’s important. Caching is a technique used by web servers to store frequently requested content in memory so that it doesn’t need to be retrieved again from disk storage. This helps reduce load on the server and improve response times for users.
Understand Caching Basics.
Understanding how caching works will help you decide whether or not to use it. If you do choose to implement caching, there are several things you should consider before doing so. First, make sure that you’re using a good caching solution. Second, make sure that you are only caching static files (images, CSS, JavaScript) and not dynamic pages. Third, make sure that you aren’t caching too much data. Fourth, make sure that you test your caching strategy thoroughly. Finally, make sure that you keep track of your cache hits and misses.
Create a Plan for Your Site.
A site plan is a visual representation of your website. It helps you see where everything is located and how it fits together. You can also use a site map to help visitors navigate through your site.
Implement a Test Run.
If you’re not sure whether or not your site will work well with caching, try implementing a test run. This means that you should temporarily turn off caching on your site so that you can see how it works. Once you’ve determined that your site does indeed function properly without caching, then you can implement caching on your site permanently.
Monitor Results.
Caching is one of those things that sounds good in theory, but isn’t necessarily easy to do in practice. It requires careful planning and monitoring to ensure that your site functions as expected. You need to make sure that your site loads quickly and efficiently, and that visitors aren’t left waiting for pages to load.
Adjust as Needed.
There are several different ways to implement caching strategies, and each has its own pros and cons. One of the easiest methods is to use a CDN (content delivery network). A CDN is essentially a group of servers located across the globe that store copies of your website files. This means that when a visitor requests a file, the CDN will retrieve the file directly from the closest server instead of having to go through your web host.
What are the 5 Ways to Reduce Page Loads on Your WordPress Site?
The term “cache” refers to any type of storage that helps websites load faster by storing frequently used data in memory so it doesn’t need to be retrieved from disk every time a page loads.
Cache plugins are essential tools for improving website speed. Learn about them here!
Install WP Super Cache.
If you’re using WordPress as your CMS (content management system), then you’ll probably want to use one of the caching plugins available. These plugins store static files such as images, CSS, JavaScript, and HTML pages in memory rather than on your server’s hard drive. This means that when a visitor requests a file, the plugin will retrieve it directly from its cache instead of having to go back to your server.
Enable GZIP Compression.
You should enable GZIP compression on your site because it reduces the size of the data transferred between your visitors’ browsers and your web servers. It also helps reduce bandwidth usage by reducing the number of HTTP requests made to your server.
Add an Expires Header.
If you’re using a caching plugin, make sure it’s set up correctly. Many caching plugins will automatically add an “Expires” header to your pages. This tells the browser to cache the page so it won’t need to request it again. However, some caching plugins don’t do this properly. Make sure you check the documentation for your particular plugin to see how to configure it.
Remove Unnecessary CSS/JS Files.
A good rule of thumb is to remove any unnecessary files from your site. These include things like images, scripts, stylesheets, and other assets that aren’t necessary for the page to function. You should also consider removing unused JavaScript libraries.
Minify JavaScript & CSS.
If you’re using a popular CMS such as WordPress, there’s a plugin called W3 Total Cache that will help you reduce page load times by caching static assets (such as HTML, CSS, and JavaScript) so that users won’t need to download them again when they visit your site. This helps improve performance because it reduces the number of requests made to your server.
What is a Leverage browser caching?
Leverage Browser caching means the storage of webpage resource files on a local computer when a user visits a webpage/website.
What is Leverage Web Browser Caching?
Leverage Browser Caching means storing all static files of a website in the visitor’s web browser. And then retrieving them from the browser quickly instead of getting it again from the web server. Further, it helps to speed up each webpage of your website.
How Leverage Web Browser Caching Works?
When a visitor visits a web page, your browser downloads all content of that page as well as common static files like CSS and js files. And, when the same visitor visits other pages of the same website, the visitor’s web browser downloads them again.
Assume you have enabled Browser Caching, then all statics files will serve from your browser instead of the webserver. Now when you will visit any page of the particular website, it will only download unique contents of that page and static files will serve from your browser itself. Using Browser Caching speed up each page of a website. Browser Caching can be handled in WordPress.
What are the Benefits of Browser Caching in wordpress?
The Primary benefit of Leverage Web Browser Caching speeds up your website because all the static files will serve from your browser. It saves internet data of website visitors. It also saves bandwidth of website servers and decreases the load of the webserver. Further, it also decreases HTTP requests from both ends.
What are general guidelines while setting expiries of Browser Caching?
The general guidelines include the following two points. They are given below.
All static content (global CSS styles, logos, etc.) of the web server is access plus 1 year
Everything else -is access plus 1 week
Why is clear Browser Cache important?
The primary reason for the importance of leverage browser caching is that it reduces the load on your web server, thus ultimately reduces the load time of your visitors too.
How to clear browser cache?
To enable browser caching all you need to do is edit your HTTP headers to set expiry times for certain types of files as below.
All static content (global CSS styles, logos, etc.) of web server – access plus 1 year
Everything else – access plus 1 week
In fact, having an optimal caching strategy of browser caching help improve the performance of your site.
What are the best recommendations while enabling browser caching?
The best recommendations while enabling browser caching are
1. Be aggressive with your caching for all static resources of the web server.
2. The recommended expiry of browser caching is “access plus 1 year”, Whereas at a minimum of “one month”.
3. Don’t set your browser caching more than a year in advance.
How to Clear Browser Cache for Chrome, Firefox, Internet Explorer & More?
Please follow below how to clear browser cache on Google Chrome, Mozilla Firefox, Microsoft Edge, Safari, Opera, Internet Explorer, and more.
Clear Browser Cache on Google Chrome
If you use any of these browsers, then you should clear browser cache regularly. This will help speed up browsing and improve your web experience.
Clear Browser Cache on Mozilla Firefox
To clear browser cache on Mozilla Firefox, follow these steps:
1) Open the address bar and type “about:cache” (without quotes).
2) Click the button labeled “Clear Recent History”.
3) Press Enter.
4) Wait until the process completes.
5) Close the tab.
6) Restart Mozilla Firefox.
7) Enjoy!
Clear Browser Cache on Microsoft Edge
If you use Microsoft Edge as your web browser, you might not realize that there’s an option to clear browser cache. You can do so by following these steps:
1. Open the address bar and enter “settings://advanced settings/clear browsing data” (without quotes) into the search box.
2. Select “Delete cookies and other site and plug-in data”.
3. Confirm the deletion.
4. Restart Microsoft Edge.
5. Enjoy!
Clear Browser Cache on Safari
If you use Apple’s Safari browser, you can also clear browser cache by using the same method described above. To clear browser cache on Safari, follow these steps:
1.) Open the address bar and type “about:cache” into the search box. This will open up a new tab with a list of items that can be cleared.
2.) Click on “Clear Browsing Data”.
3.) Confirm the deletion. 4.) Restart Safari. 5.) Enjoy!
Clear Browser Cache on Opera
You can also clear browser cache on other browsers such as Opera. To do so, simply click on the menu button (three horizontal lines) at the top right corner of the browser window and select “Settings”. Then, scroll down until you see “Cache”. Select “Empty Cache”.
Why you should use Browser Caching in WordPress?
Browser caching is an essential part of any web development project. It allows us to save the state of our site so that when users return later, they will see the same content as before. In this article, we’ll show you why browser caching is important for your website.
We’ll also show you how to set it up correctly.
If you’re using WordPress, there’s no need to worry about setting up browser caching. You can simply enable it by adding a few lines of code to your theme’s functions.php file.
The Basics of Browser Caching.
Browser caching is an easy way to speed up your site without having to make any changes. It works by storing static files (like images) on your server so that when a visitor requests them again, they will load faster. This means that visitors won’t have to wait for large files to download before viewing your site.
Setting Up Cache Settings in WordPress.
To set up cache settings in WordPress.org, go to Appearance > Customize > Site Identity > General Options. Then click on “Caching” and select “Use browser caching.” You can also add additional options here.
Using WP Super Cache.
If you’re using WordPress as a CMS (content management system), then you need to make sure that your site loads fast. This means that you need to optimize your site so that it loads faster. One of the ways to do this is by adding a plugin called WP Super Cache. It’s free and easy to install.
Using W3 Total Cache.
There are two main reasons why you should use browser caching in WordPress. First, it will speed up your site load times. Second, it will help prevent visitors from leaving your site because it will keep them on your site longer.
What are 5 Ways to Leverage Caching for Your Web Site?
Caching is one of the most important techniques used by webmasters to speed up their websites. In this article, we’ll show you five ways to leverage caching on your website.
Leveraging caching is an effective way to improve performance for your site. This article will teach you how to use caching effectively.
Cache Static Assets.
One of the easiest ways to cache static assets is to use a CDN (Content Delivery Network). A CDN is a network of servers located across the globe that store copies of your files so that when users request them, they’re served quickly from the closest server.
Cache Dynamic Pages.
If you have dynamic pages on your site, such as those with user generated content, you should consider using a CDN to cache these pages. This will help reduce load times and improve performance.
Cache User Generated Content.
A CDN (Content Delivery Network) is an Internet service provider that delivers static files, such as images, JavaScript, CSS, and HTML, to users. It caches these files so that when a user requests them again, the file is delivered more quickly than if it had to be retrieved from the origin server.
Cache Search Results.
One of the easiest ways to use caching is to cache search results. This means that instead of having to retrieve each individual result from the database every time a user performs a search, the results are cached and served directly from the CDN.
Cache Page Speed.
Another easy way to leverage caching is to cache pages on your site. If you’re using WordPress, there’s an option to automatically cache pages when they’re updated. You can also manually set them to cache through the wp_options table.
What are the 5 Ways to Speed Up Your WordPress Site?
Learn how to speed up your WordPress site using these seven tips!
Cache is an important part of any website that uses PHP code for dynamic content. It allows the server to store static files so that when a visitor requests a page, the server doesn’t need to re-download all those files again. This saves bandwidth and speeds up loading times.
Install a caching plugin.
There are several plugins available that will cache pages on your site. These plugins work by storing static files (like images) on your server instead of downloading them every time a user visits a page. They also allow you to control what gets cached and when.
Add an SSL certificate.
If you haven’t added an SSL certificate to your website yet, now is the perfect time to do so. An SSL certificate encrypts data between your visitors and your web server, making it more secure and protecting your customers’ personal information. It’s free to add one to your site, and there are plenty of options out there.
Use a CDN.
A Content Delivery Network (CDN) is a network of servers located across the globe that store copies of your website files. This means when a visitor requests a file from your site, the request will go directly to the closest copy of the file instead of having to travel through multiple servers.
Minify CSS and JavaScript.
Minifying your code helps reduce the size of your web pages by removing unnecessary characters and comments. It also makes your code more efficient because fewer bytes mean less data traveling between the server and the browser.
Remove unused plugins.
If you use any plugins, make sure to remove them when not needed. This will help keep your website running smoothly and save space on your server.
Conclusion
One of the most important criteria for ranking a website is speed. Having a fast website really means that your website content should load quickly. Thus allowing your visitors to be happier and get the information they requested with ease. One of the parameters to achieve higher page speed is by using it. It helps to improve the web performance testing score.
