Step 2 — Testing Compression of ZIP
Verify Your Compression
Once you’ve configured your webserver, check to make sure your webserver actually serving compressed content to the client’s browser.
Approach 1: Via Online
You can use the online compression tools to check whether gzip is enabled on your website/page.
In the event that your web server does n’t enable it, you may likely see warnings and mistakes in online speed testing tools such as Google PageSpeed Insights and GTmetrix.
GZIPCompression Testing tool
online gzip test
WebPageTest.org
GZIP Warning in GTmetrix
GTMetrix also offers a recommendation to allow compression to lessen the transfer size of the static assets.
GZIP Caution in Google PageSpeed Insights
As you can see, Google says that compressing assets with GZIP or deflate may reduce the number of bytes sent over the network.
Approach 2: In Your Web browser
Use Web Developer Toolbar > Information > View Document Size to see whether the page is compressed.
Use Live HTTP Headers to examine the response. Look for a line that says “Content-encoding: gzip”.
What is web browsers way of telling the server that it can accept GZIP compressed file?
accept-encoding: gzip
This is the web browser’s way of telling the server that it can accept GZIP compressed files.
What is server’s way of telling the web browser that it sent GZIP compressed file?
Lets assume that browser send the “accept-encoding: gzip” request header of web browser.
If the server sees gzip in the “accept-encoding” request header of web browser, Server compress the file with GZIP compression. And, server sends the below header in the response to web browser.
content-encoding: gzip
This above header response tells the web browser that the file server sent to web browser must be decompressed using GZIP before displaying it to the user.
What is the impact of GZIP compression on server?
Enabling GZIP compression on a server will vary depending on your server configuration. However, you may verify that files are being GZIP compressed/decompressed by looking at the below two headers in the request/response lifecycle for a resource.
accept-encoding: gzip [From Web Browser to Server]
content-encoding: gzip [From Server to Web Browser]
How to Verify if Compression is Enabled?
When a server sends a compressed file to your favorite browser, the content-length response header reflects the transfer size (compressed version) of the message-body in bytes.
You can verify gzip compression status by downloading an HTTP-served file and comparing the file size on your machine with the content-length size.
How to Test GZIP Compression on macOS?
Here is the command to test GZIP Compression on macOS.
gzip -c test.css > test.gz
If you compare the file before compression w.r.to the file after compression, you will come to know whether compression is happened as per your expectation.
Could you provide the overview of Compression?
Compression helps to reduce the size of files sent from your server to increase the speed to which they are transferred to the browser. Compression Reduce the sizes of web pages by up to 70% of its original file size. It Increase webpage speed. The Cost benefit ratio of compression is high.
For compression, Access needed to be given to the .htaccess files or server administration files of server.
What is compression?
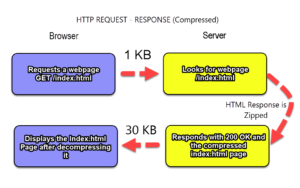
Lets assume that When a user hits a webpage of a website, a call is made to your server to deliver the requested files. The bigger these files are the longer it is going to take for them to get to your favorite browser and appear on your screen.
Gzip/Brotli compresses your web pages and style sheets before sending them over to the favorite browser. It do reduces the transfer time of file since the files are much smaller. If you consider the cost vs benefit, compression must be near the top of your webpage speed optimizations if you do not have it setup already.
To check for GZIP compression without an external tool, you may use the developer tools panel in your favorite browser. Most modern browsers let you inspect page elements of a webpage and view performance data of it.
First, load the webpage you want to check in your favorite browser. Then, open the developer tools panel of the browser and do select the Network tab. There you will see a list of all the resources/files sent by the webserver. if not, you may need to reload the web page. Click one resource to view its contents. Please do make sure that you have selected the Headers tab, and then scroll down to the content-encoding header. It helps to see which method was used.
Therefore, You may See that how a resource was compressed with GZIP using Chrome Developer Tools:
What are the caveats of GZIP Compression?
As exciting as it may appear, GZIP Compression has certain caveats of GZIP Compression. They are mentioned below.
Older browsers
Some of the browsers still may have trouble with compressed content of files. For instance, Netscape 1.0 on Windows 95. Apache mod_deflate has rules to avoid compression for older browsers.
Do Not Compress the resources which are already compressed
Most images, music and videos are already compressed. Please do not waste time compressing those resources again. In fact, you probably only need to compress HTML, CSS and JavaScript resources.
Low CPU Load time
Compressing content on the fly may use Low CPU time. Usually it is a great tradeoff by the given the speed of compression.
Pre Compress static content
There are many ways to Pre-Compress static content of a website and send over the compressed versions of the files. However, it requires more configuration in some use cases. Using more CPU time for a faster user experience is well worth it.
Saves bandwidth
Compression of the content saves bandwidth too.
Therefore, Enabling GZip compression is one of the fastest way to improve your web site’s performance. Go forward, to set it up, and let your users/visitors enjoy the benefits of GZip Compression
How to know if GZIP Compression is working?
You can use the either Online Compression Checker Tool (or) Developer Tools to verify whether GZIP Compression is working. Please select the Network tab, choose the filename, and look at the Headers tab on the right side of it.
How to Use GZIP Test Tool?
GZIP Compression Checker checks whether GZIP compression is enabled on the webserver hosting the website. GZIP Compression Checker tool will connect to your server hosting your website and display whether compression is enabled.
Here is Step by Step Guide of testing GZIP compression Tool.
Step 1:Insert your domain URL in corresponding field
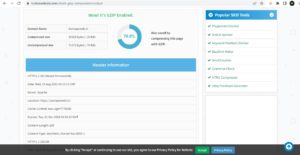
Type the Https domain URL you want to test in the corresponding field of GZIP Compression Checker tool. It will perform a quick GZIP Compression test and display information about compressed and uncompressed files on a particular website. Please do take a closer look at the details. For instance below, we checked https://auniqueweb.in/ website.
Check GZIP compression of a webpage Image
Step 2: Interpreting the GZIP Compression Checker Tool Results
In the screenshot below with the auniqueweb.in results, you get information about whether GZIP Compression is used at the website.
What are most accepted content encoding algorithms?
Here are the accepted content encoding algorithms. They are
1. Deflate
2. Gzip
3. Brotli
Almost all modern web browsers understand these content encoding algorithms.
What is the importance of GZIP Compression Test?
With GZIP Compression Tester Tool, you can check if your website has enabled GZIP Compression. By simply connecting to your domain and requesting the necessary information, GZIP Compression Tester tool will show the result whether GZIP Compression is used on a website.
This way, you may find out if GZIP Compression is connected to the website. And if not, you may fix the issue to get more traffic from search engines. In addition to that, GZIP Compression has a positive effect on the user experience.
May i Use Gzip Compression in Conjunction with a content delivery networks (CDNs)?
Almost all Content Delivery Networks (CDNs) provide automated file compression with gzip Compression. This relieves you of the need to verify that GZIP compression is enabled.
And, Content Delivery Networks typically support a number of front-end optimization techniques. It can be used in conjunction with gzip Compression to further shrink outgoing files size. For Instance, minification reduce the size of a resources such as JavaScript, HTML and CSS by half before the GZIP compression.
Therefore, Content Delivery Networks perform both minification and gzip compression. Thus minimize the size of the files delivered to your Visitors/Users by significantly reducing webpage load time.
Does all servers support gzip compression?
Yes, Almost all of the servers support GZIP compression. You can enable and test the gzip compression support on your server. Alternatively, You may please view documentation of your server on how to enable GZIP compression.
You may find your favorite server in the list of servers below. You may find your favorite server is configured with recommended settings.
Here are the list of your favorite server & the configuration with recommended settings.
Apache: Use mod_deflate
Nginx: Use ngx_http_gzip_module
IIS: Configure HTTP Compression
Does all modern browsers support and automatically negotiate gzip compression?
Yes, All modern browsers support & automatically negotiate gzip compression for all HTTP requests.
What enabling GZIP Compression can do?
By Enabling GZIP compression you may achieve the following. They are
1) reduce the size of the transferred response. That too up to 90%.
2) reduce the amount of time to download the resource,
3) reduce data usage for the client,
and 4) improve the time to first render of your web pages.
What are the Alternatives to GZIP Compression?
As we all agree that The world of data compression on the web is advancing Rapidly. With the average webpage weight size has been increasing constantly, web technology too is trying to catch up with it to make transferring data over the web more efficient. Over the past few years, Brotli compression algorithm has gained widespread popularity. Initially, Brotli compression’s main focus is to compress WOFF2 web fonts. However, since then it has expanded to support compression for any type of data. Brotli Compression compresses data better than GZIP. However, it may require considerably more time and resources to compress the data. Its decompression time is more or less comparable to that of GZIP Compression.
Does most of the modern browsers supports Brotli Compression?
These days, Most of the modern browsers supporting Brotli Compression.
Does most of the modern servers supporting Brotli Compression?
To supportt Brotli Compression, your website must follow one of the below.
a) Host your website with a hosting provider that supports Brotli Compression.
b) Hosting provider must allow you to install the Brotli libraries.
Does WordPress supports Brotli Compression?
Usually, Most of the managed WordPress hosts do not support Brotli Compression outright yet. using it on WordPress websites is slightly tricky.
Does CDNs supports Brotli Compression?
However, if you use a CDNs (such as Cloudflare, KeyCDN), you can enable Brotli Compression easily.
What Brotli Compression is famous for?
Brotli Compression is famous for compressing the static assets.
What are the Advantages of GZIP Compression?
Here are the most important advantages of GZIP compression. They are
Decent Compression Ratio
Though GZIP does not have the best compression ratio when compared to its competetors, Typically, it can help you reduce the size of text-based resources by 70-90%.
Compression and Decompression Speeds
Regarding data compression and decompression speeds of data, GZIP is the clear winner when compared with other competetors. Higher compression and decompression speeds of data is highly desirable in HTTP servers and other data streams.
Consumes Very Little Memory
GZIP Compression consumes minimal memory. This Property of GZIP Compression making it one of the most suitable for servers and systems with limited memory capabilities. Hence, it is supported by the cheapest webhosting providers.
Does not Expand Much Even in Worst Cases
Lossless data compression techniques such as GZIP Compression have a strict limit. GZIP Compression can not compress data beyond which they can not compress data. GZIP Compression is highly resistant to entropy encoding effect.
Free to Use and Open Source
It is primarily created as a free, open source. This is a replacement for the patented compress program used by the early Unix Operating systems. Thus, It may be used freely by any one.
Enjoys Universal Support
According to a report published on WWW, GZIP compression is used by more than 83% of all the websites. It is making it the most widely used compression algorithm across the World Wide Web. GZIP compression is supported by almost all servers and Browsers. No matter which server you host your website on, you can speed it up by enabling GZIP compression on it.
What is entropy encoding?
Typically, when the resource is already compressed or if it is tiny and the overhead of adding the GZIP dictionary is higher than the benefits of compressing the data, then this phenomenon is called as entropy encoding.
Does Cloudflare can gzip my website content too?
Yes, Cloudflare has been using gzip to compress website content.
What file formats does GZIP Compression supports?
GZIP can support the following 3 file formats. They are
.gz files
It denotes the file extension of GZIP files.
.tar files
tar format is used to store various archive files, But it does not compress data. GZIP is used here to shrink .tar files.
.tgz, .tar.gz, .gz files
GZIP may compress all the .tgz, .tar.gz, .gz file formats very efficiently.
Conclusion
GZIP Compression can help you reduce the quality of a web document. Be it like HTML, PHP, CSS and Javascript documents. It can reduce the size to the subject of 60% or much less of its initial size before these data files get delivered to the browser of a user. This compressed document is then served to the web browser of the user. Browsers Then decompress it instantly to load the entire original document in the browser once again. Enabling it is ideal for enhancing page speed because these potential customers will have to download much smaller sized web documents as the initial types when browsing your webpages. It boosts the download time for these data files.
GZIP is quite common nowadays. In fact, it is enabled by default on all servers. All most all modern browsers handle the “content-encoding: gzip” HTTP response header. All modern browsers like chrome, firefox support it.
HTTP response size may be reduced by using Compression. GZIP is the most well-known and effective compression technique available for HTTP response. It generally decreases the response size to 60-70%.
Therefore, webmasters need to make sure that the server is properly configured to provide the compressed source when requested by your client’s browser. It means that it takes much less time to load your web pages, and very less bandwidth is used over all.